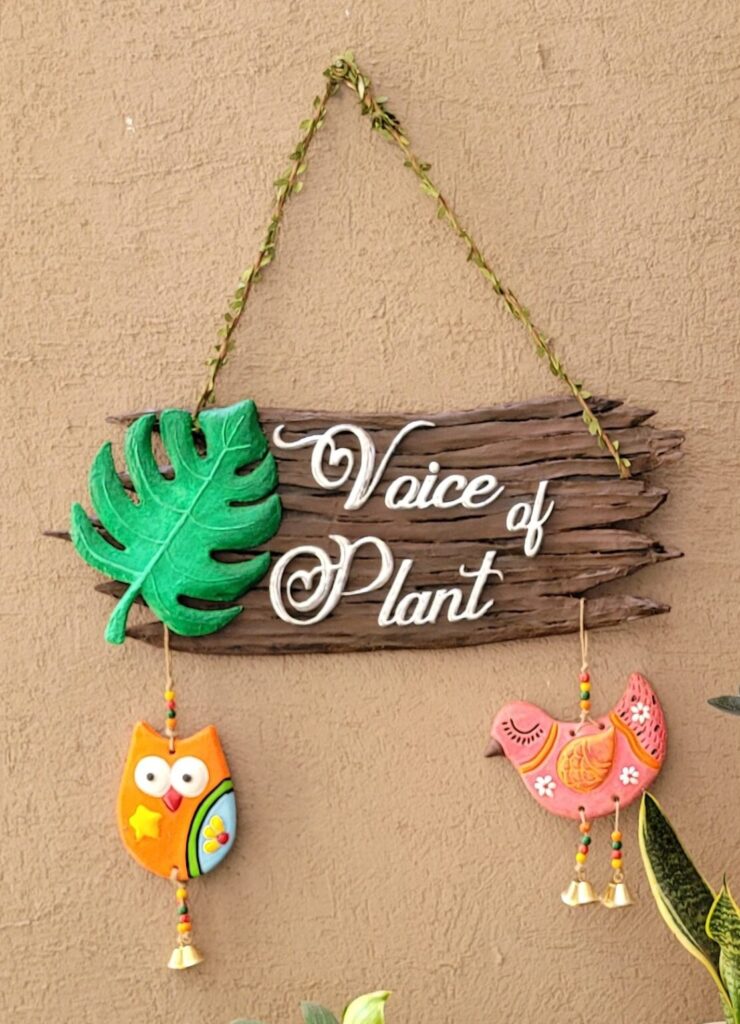
Creating a personalized garden name board is a fantastic way to add a unique touch to your outdoor space. This guide will show you how to make a realistic wooden name board featuring a Monstera leaf design using simple materials like cardboard from Amazon boxes. Follow these step-by-step instructions to craft a beautiful and durable garden sign.
Materials Used
- Cardboard (Recycled Amazon boxes)
- Tissue Paper
- Fevicol Glue
- Asian Paints Distemper https://amzn.to/4bvU3TX
- Colors (Acrylic paints or any suitable outdoor paint)
- SunBoard for Letter Cutout Buy Link : https://amzn.to/4e71kvo
- Fevicryl Fabric Glue https://amzn.to/4byoFEw
- Printout of Letter and Monstera leaf ( can be downloaded from google)
- Terracotta Hanging Tiles (Optional, for added decorative elements)
Step-by-Step Instructions
Step 1: Prepare the Cardboard Base
- Select and Cut the Cardboard: Choose sturdy pieces of cardboard from Amazon boxes. Cut out a rectangular piece to serve as the base of your name board. Ensure it’s large enough to accommodate your design and text.
- Reinforce the Cardboard: If the cardboard is thin, reinforce it by gluing additional layers together using Fevicol Glue. This will make the base more durable.
Step 2: Create the Textured Surface
- Apply Tissue Paper: Scrumble the tissue paper and glue them onto the cardboard base using a mixture of Fevicol Glue, Water and Distemper (a 1:1 ratio works well). This will create a textured surface
- Let it Dry: Allow the tissue paper to dry completely. This may take a few hours.
Step 3: Grain Effect
- Add Wood Grain Effect: Use a cutter to add grain effect and also color it black on the depth of the cut mark
Step 4: Create the Monstera Leaf and Letters
- Print and Cut Out the Designs: Print out a template of a Monstera leaf and the letters for your garden name. Cut out these shapes.
- Sticking the Print: Stick the Monstera print on the cardboard and letters on the sunboard
- Paint the Elements: Paint the Monstera leaf and letters with your chosen colors. For a realistic look, use varying shades of green for the leaf and a contrasting color for the letters.
Step 5: Assemble the Name Board
- Attach the Elements: Once the paint is dry, use Fevicryl Fabric Glue to attach the Monstera leaf and letters to the cardboard base. Arrange them in a visually appealing manner.
- Optional Terracotta Tiles: For an added decorative touch, you can glue terracotta hanging tiles to the bottom of the name board. These can be painted or left in their natural state.
Step 6: Final Touches
- Sealing the Board: To protect your name board from the elements, consider applying a clear sealant (Varnish). Buy Link https://amzn.to/4bOgofa. This will help make it weather-resistant and prolong its life.
- Adding Hanging Hardware: Attach hooks or a rope to the back of the board for easy hanging in your garden.
Tips for Success
- Experiment with Colors: Don’t be afraid to mix and match colors to achieve the perfect wood grain and leaf effect.
- Precision in Cutting: Take your time cutting out the SunBoard elements to ensure clean, crisp edges.
- Drying Time: Allow adequate drying time between each step to ensure the best results.
By following these steps, you can create a stunning and personalized garden name board that adds character and charm to your outdoor space. Plus, using recycled materials like Amazon boxes not only makes this project eco-friendly but also budget-friendly. Happy crafting!
Watch full diy video
Everything here is free to explore and learn. If you’d like to fuel this page and keep it going, you can support through a donation.
💖 Support