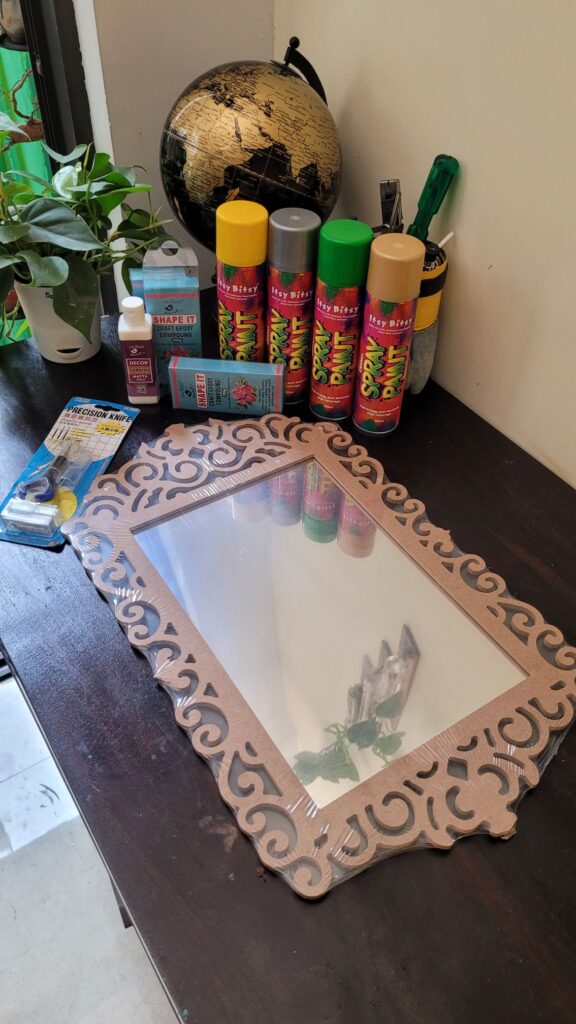
Creating a vintage mirror is a fantastic way to add a touch of elegance and charm to your home decor. With the MDF precut mirror kit from Itsybitsy, you can easily craft a beautiful vintage mirror that looks like a treasured antique. Follow this step-by-step guide to make your own DIY vintage mirror using the materials provided in the kit along with some additional products.
Materials Used
- MDF Precut Mirror Kit: Buy here
- Shape it Clay: Buy here
- Metallic Wax: Buy here
- Discount Code: Use code THEKRAFTCO for extra discounts
Adding Embosing Effect Using Shape it Clay
- Condition the Clay: Take small amounts of Shape it Clay and knead it until it becomes soft and pliable.
- Create Decorative Elements: Roll out the clay and shape it into long stipes.
- Attach the Clay: Apply the clay designs to the MDF frame, Use a bit of talcum powder to smooth surface. Allow the clay to dry completely according to the manufacturer’s instructions and then stick it with super glue.
Step 4: Paint and Enhance with Metallic Wax
- Base Coat: Once the clay is dry, paint the entire frame, including the clay details, with a black base coat of acrylic paint. Choose a vintage color such as cream, pale blue, or soft green. Let it dry completely.
- Apply Metallic Wax: Using a fingure tip, apply the Metallic Wax to the raised clay details and the edges of the frame. This will give the mirror an antique, gilded look. Apply the wax sparingly at first, building up the color until you achieve the desired effect.
Step 5: Final Touches
- Seal the Frame: For added durability, especially if the mirror will be handled frequently, apply a clear sealant over the painted and waxed areas. This will protect your work and give it a finished look.
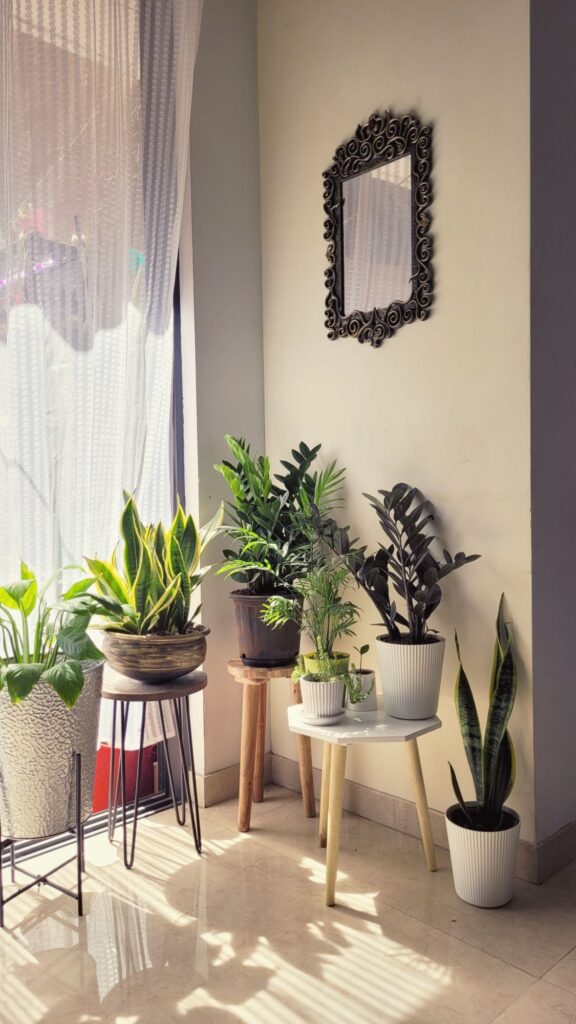
- Hang Your Mirror: Once everything is dry, attach any hanging hardware if not already included. Choose a prominent spot in your home to display your beautiful vintage mirror.
Tips for Success
- Experiment with Clay Designs: Feel free to get creative with your clay designs. I have experienced that I wait for 4 5min after kneeding the epoxy and harder clay
- Layer the Wax: For a more aged look, layer different shades of metallic wax, such as gold and bronze.
- Patience is Key: Allow adequate drying time between each step to ensure the best results and durability.
By following these steps, you can create a stunning vintage mirror that adds a touch of elegance to any room. The MDF precut kit from Itsybitsy makes this project easy and enjoyable, even for beginners. Plus, with the code THEKRAFTCO, you can enjoy extra savings on your purchase. Happy crafting!
Everything here is free to explore and learn. If you’d like to fuel this page and keep it going, you can support through a donation.
💖 Support