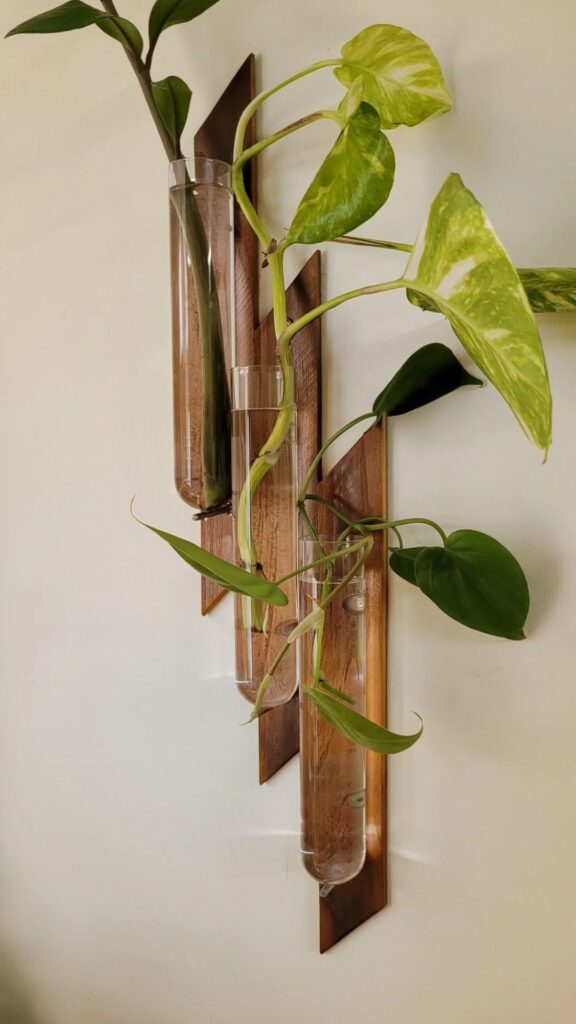
Adding a touch of nature to your home or office decor can be both stylish and innovative. A magnetic test tube planter offers a unique and space-saving way to display your favorite plants. This simple DIY project allows you to create an elegant vertical garden that can be mounted on any magnetic surface. Follow these steps to make your own magnetic test tube planter.
Materials You Will Need
- Test Tubes – Buy here
- Magnets – Buy here
- Wooden Pallets – Available at your local timber shop
- Flexkwik – Buy here
- Fevicryl Fabric Glue – Buy here
- Varnish Spray – Buy here
Step-by-Step Instructions
Step 1: Prepare the Wooden Pallet
Cut the Wooden Pallet:
- Measure and cut the wooden pallet to your desired size. For a design similar to the one in the image, cut 3 lengths to create a layered look.
- Sand the edges to smooth out any rough spots
Joint the Pallets
- Align and joint the pallets in ascending position.
- Join it using fevicol
- Drill a hole halfway so that you can place a magnet inside
Step 2: Attach Magnets to the Test Tubes
- Prepare the Magnets:
- Attach Magnets to Test Tubes:
- Carefully press the magnet onto the side of the test tube, ensuring it is secure.
- Allow the glue to dry completely. This will usually take a few minutes depending on the glue’s drying time.
- Apply a Fabric glue on side of the magnets so that magnet gets double secured
- Tip : Before placing the magnet you can scratch that area with the sharp cutter so that glue gets a grip
Step 3: Secure the Test Tubes to the Wooden Pallet
- Position the Test Tubes:
- Magnets on both ends should match (Watch the video for clarity)
Step 4: Final Assembly
- Drill a hole to hang :
- Drill a hole on the center pallet so that it can be balanced while it is hanging on the wall
Add Plants:
- Fill each test tube with water and place your favorite cuttings or small plants into the tubes. Ensure the plants are properly hydrated and positioned.
Alternative way to use
- Find a magnetic surface, such as a refrigerator door or a metal board, and place your magnetic test tube planter on it.
- Alternatively, you can attach a metal strip to a wall and display your planter there.
Tips for Maintenance
- Watering: Regularly check the water levels in the test tubes and top up as needed to keep your plants healthy.
- Cleaning: Clean the test tubes periodically to prevent algae build-up. Remove the plants, wash the tubes with mild soap and water, and replace the plants once clean.
- Plant Selection: Choose plants that thrive in water, such as pothos, philodendrons, or propogate cuttings.
Creating a magnetic test tube planter is a fantastic way to bring a touch of greenery into any space. With minimal materials and a bit of creativity, you can craft a beautiful and functional piece of decor that is sure to impress.
Happy planting!
Watch Full Video here
Everything here is free to explore and learn. If you’d like to fuel this page and keep it going, you can support through a donation.
💖 Support