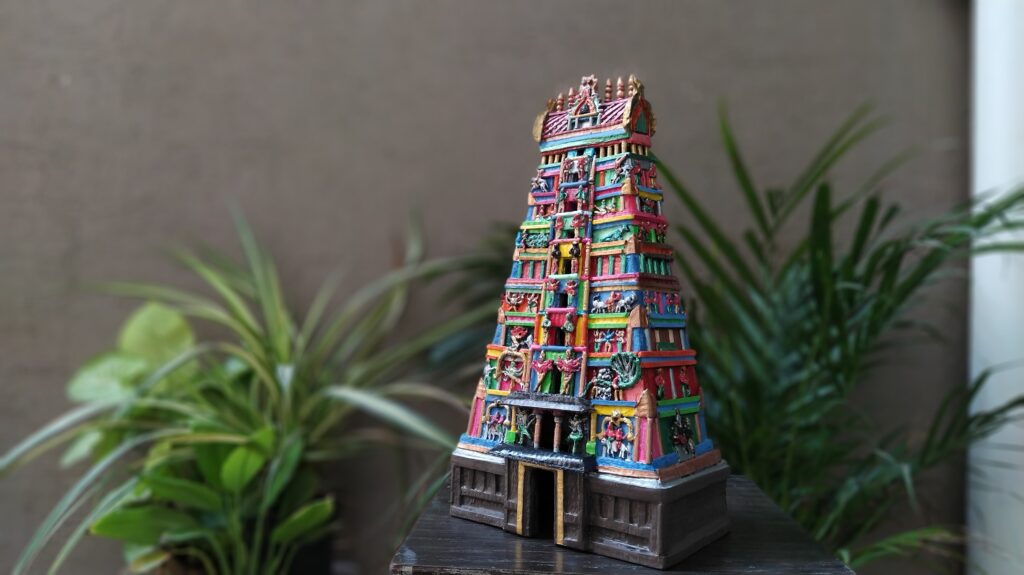
Creating a model of the iconic Madurai Meenakshi Temple Gopuram is a rewarding and creative project that captures the essence of this magnificent South Indian temple. Here’s a step-by-step guide to help you craft a beautiful replica.
Materials Needed:
- Cardboard Boxes
- BBQ Sticks | Bamboo Sticks Buy Here
- Tissue Paper
- Glue Buy Here
- Paper Tape Buy Here
- Color (Acrylic, Metallic)
Step-by-Step Guide:
Step 1: Basic Structure with Cardboard
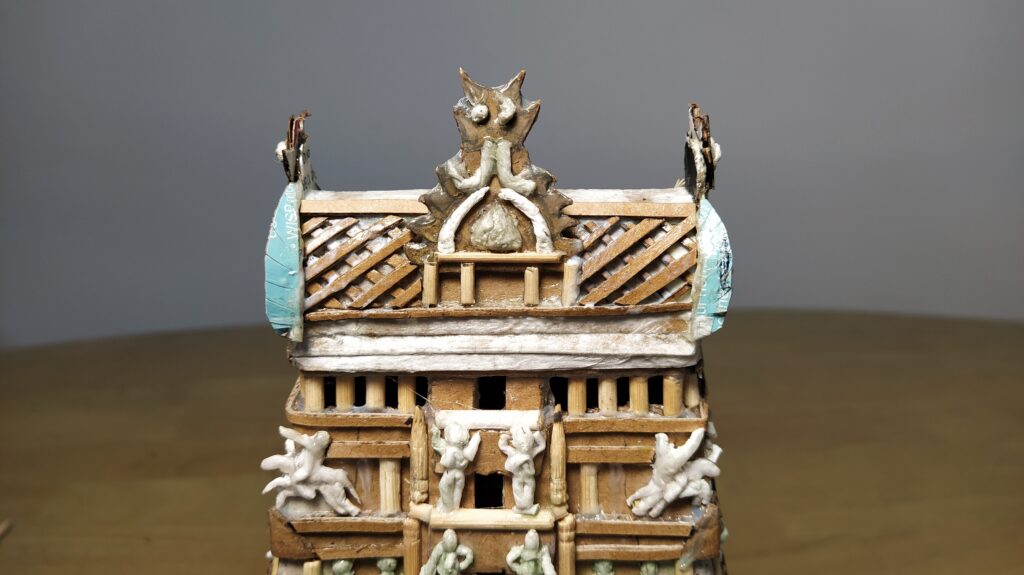
Start by creating the basic structure of the Gopuram using cardboard boxes. Cut the cardboard into the desired shapes and sizes to form the base and the tiers of the temple tower. Ensure each tier is slightly smaller than the one below to create the tapering effect characteristic of the Gopuram.
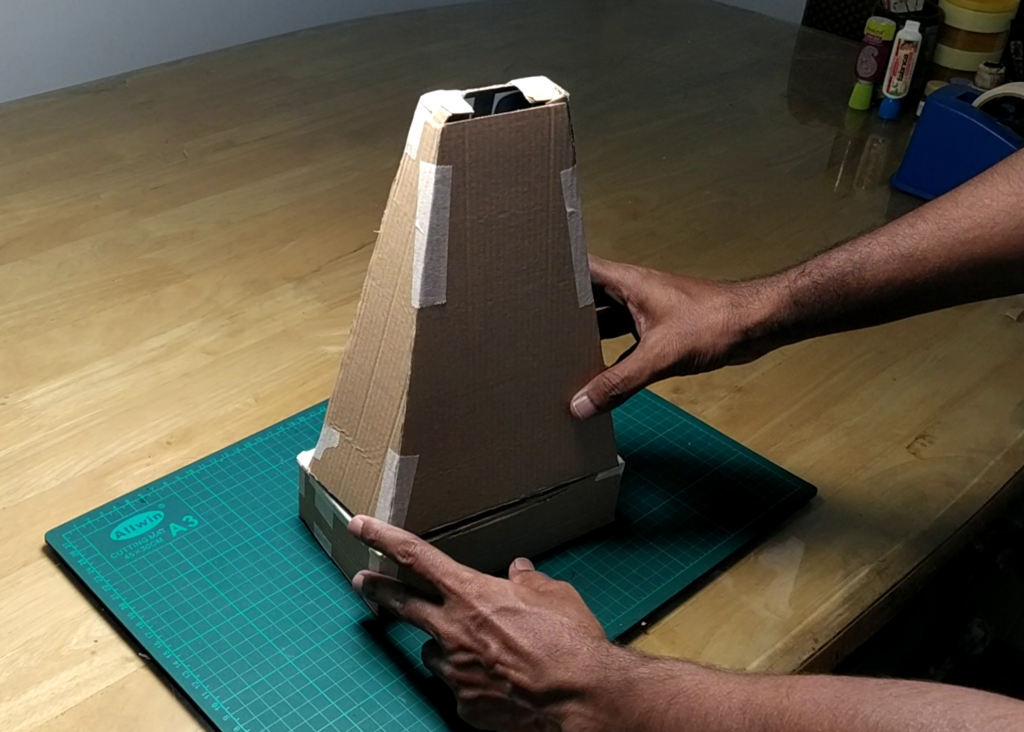
Step 2: Dividing Floors
Divide the structure into floors. Measure and cut the cardboard to create horizontal sections that represent each floor of the Gopuram. Glue these sections in place. This will help in giving a clear distinction of each tier and add depth to your model.

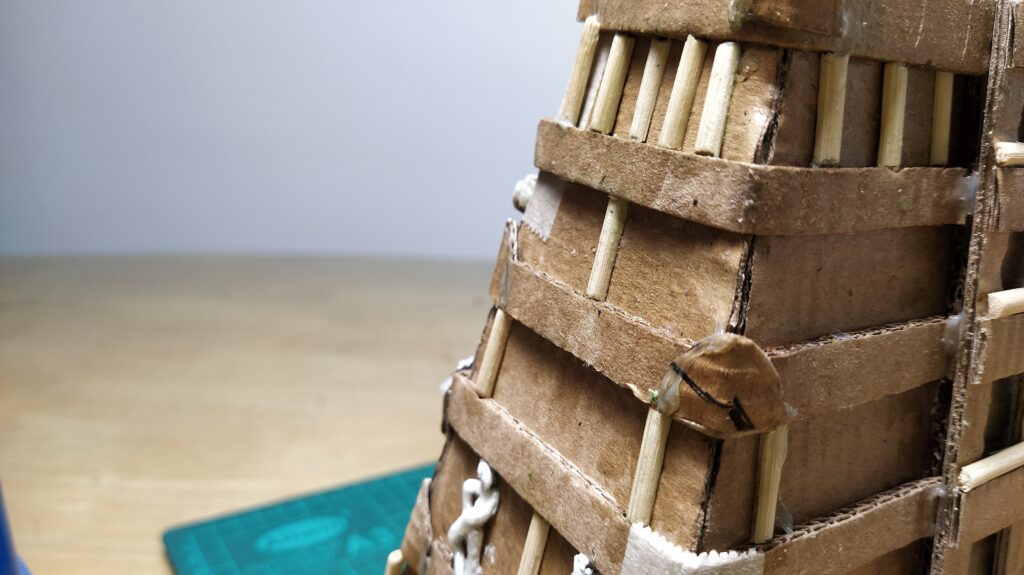
Step 3: Adding Pillars with Barbeque Sticks
Enhance the architectural detail by adding pillars. Cut BBQ sticks or bamboo sticks to the appropriate lengths and glue them vertically on the edges of each floor. These sticks will mimic the stone pillars of the actual temple.
Step 4: Applying Glue Mixture to strengthen the Cardboard
How to make Glue Mixture for cardboard projects ?
Take half part of fevicol and half part of cornflour, Add water to make a paste and mix it well. Apply it on the whole project and let it dry
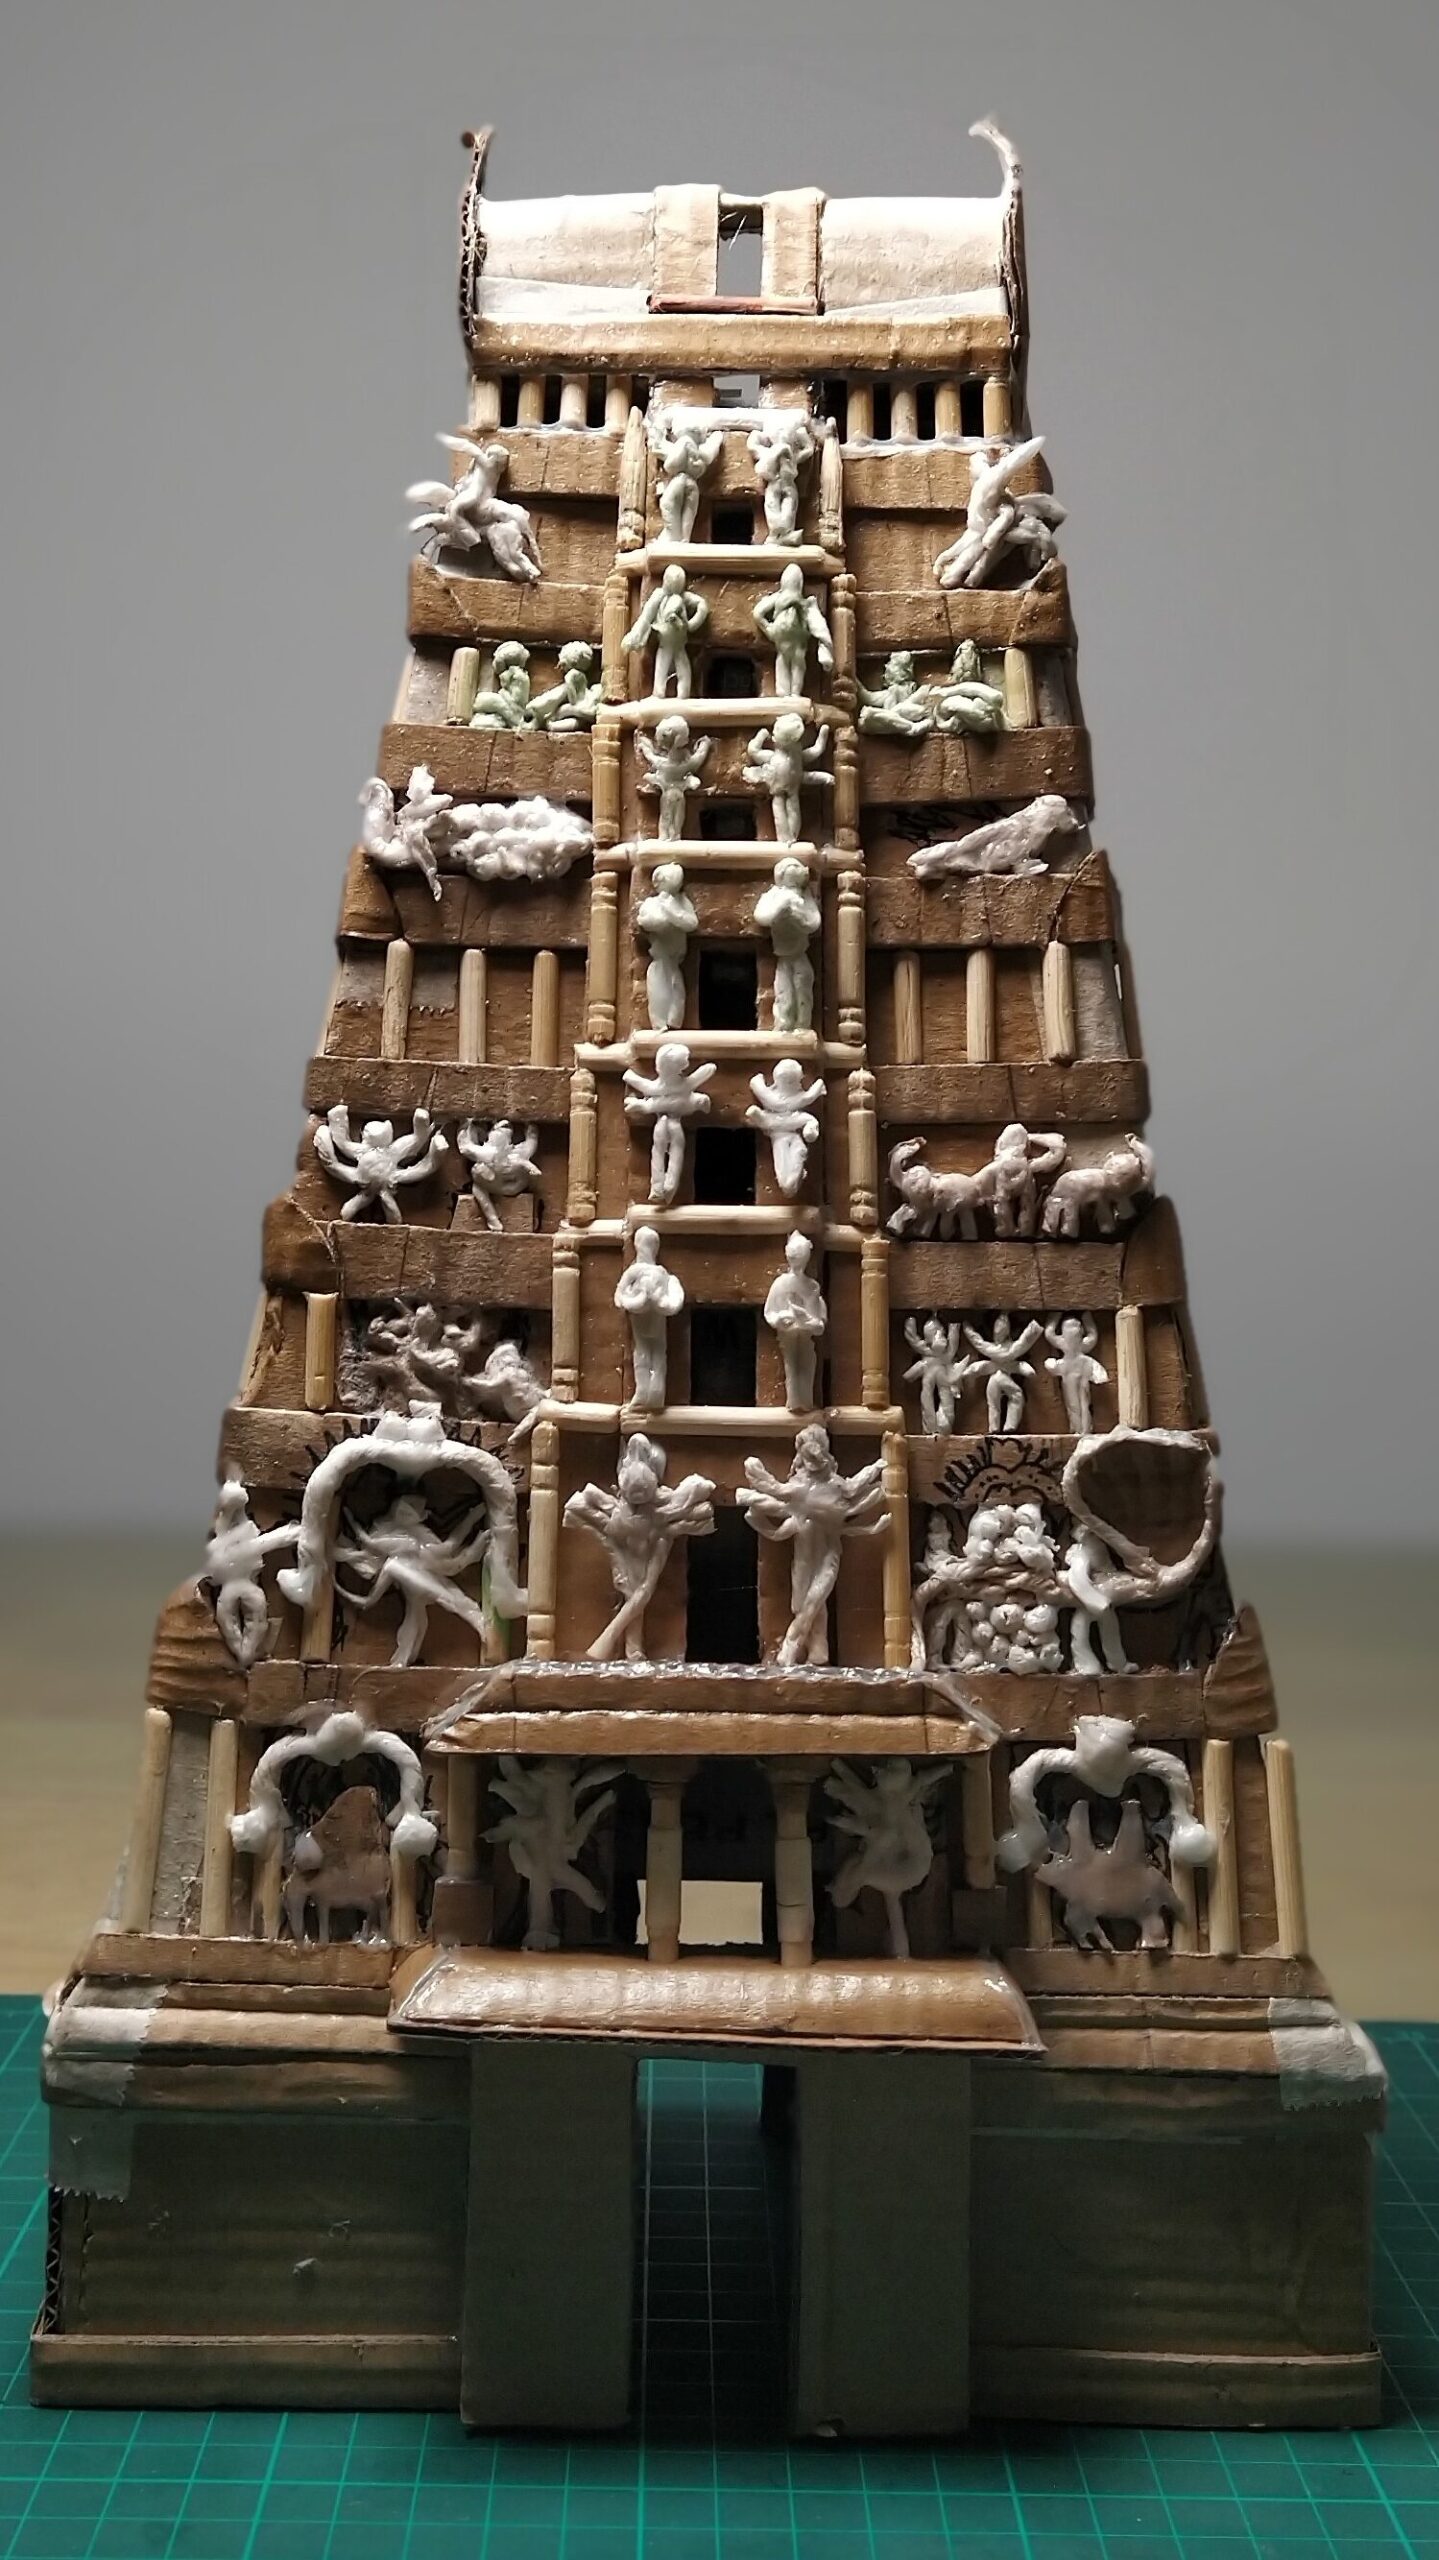
Step 5: Add As Many Idols As You Can
The Gopuram of the Madurai Meenakshi Temple is known for its intricate carvings and numerous idols. You can create small idol figures using clay or molded paper and attach them to the model. Place these idols in niches and on the surfaces of the Gopuram to replicate the crowded, ornate look of the original structure.
Step 6: Adding Mesh Detailing on the Top
For the fine mesh detailing seen on the top of the Gopuram, use a fine mesh material or create a similar effect with a netted fabric. Cut the mesh to fit the top sections and glue it in place. This will add an extra layer of detail and authenticity to your model.
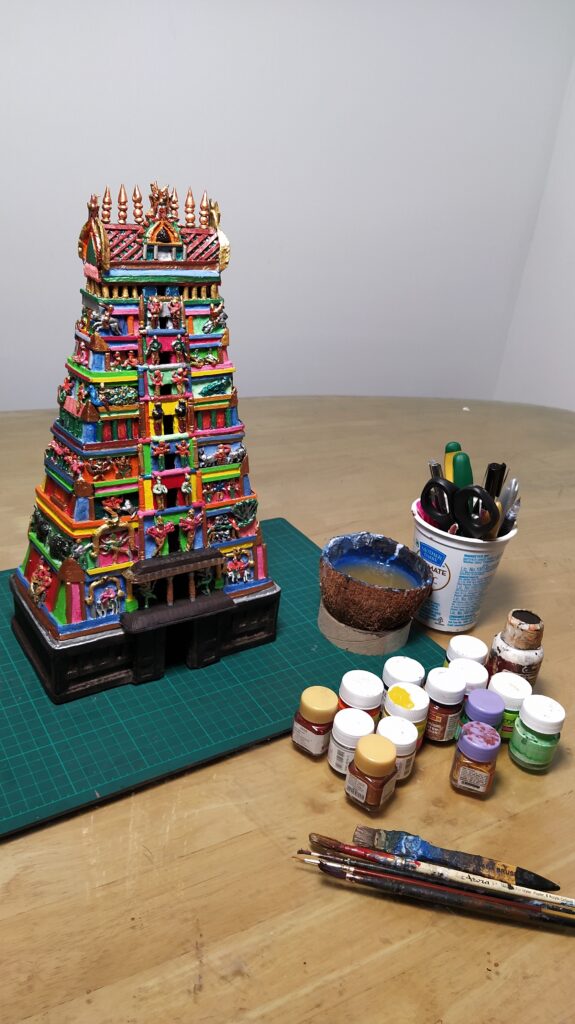
Step 7: Painting the Model
Once all the components are in place, it’s time to paint your model. Use acrylic or metallic colors to bring your Gopuram to life. Traditionally, the Gopuram is brightly colored, so feel free to use a vibrant palette. Start with a base coat and then add details with smaller brushes.


Tips for Best Results:
- Allow each layer of paint to dry completely before adding another to avoid smudging.
- Use reference images of the Madurai Meenakshi Temple Gopuram for accurate detailing.
- Be patient and take your time with the intricate parts of the model.
Creating a Madurai Meenakshi Temple Gopuram model is not only a fun and engaging craft project but also a beautiful way to appreciate and replicate a piece of Indian cultural heritage. Happy crafting!
By following these steps and using the recommended materials, you’ll have a stunning Gopuram model to display. Share your progress and final creation with us—we’d love to see how your project turns out!
This is my Latest attempt, In this I have used Epoxy clay instead of tissue paper
Everything here is free to explore and learn. If you’d like to fuel this page and keep it going, you can support through a donation.
💖 Support
you have done a marvellous job! Is this model available as a DIY kit for sale ?
Thankyou ☺️
Currently this is not for sale
Will update if I start selling
Hello,
It is so beautiful. Can you please provide the details of measurements ?
Thanks
Tad
Beautiful model..
Can you provide with the measurements of the gopuram..
did you watch both the video …measurement are provided there
It’s beautiful. Why don’t you sell your creations? I would be the first buyer.
Amount of time and love that goes in to make …doesn’t justify the price …so I am happy to keep it with me sir
Your DIY is marvellous
Can you keep it for people like me for sale.I want to keep such things for display in dasara bommala koluvy
handmade cost increases as it take too much time to make
i will try to 3d print it for sale in future
Can u make one for me pls
नमस्कार
मला गोपुरम मोठ्या साईझमध्ये बनवायचं आहे!
साईझ साधारण फ्रंटसाईझ:-फ्रंट लांंबी:-48 इंच
रुंदी:-29 इंच
उंची:-30 इंच
कृपया मार्गदर्शन करावे
You can use corel draw to design your layout first
I want to make the meenakshi temple on a bigger scale i am trying to take help from your video but i want the base like 160cm long and height accordingly will it be possible for you to guide me through it. If there is any kind of payment for the same i am willing to do it. I want it as soon as possible this i need to make before 31st august for radhaashtmi in askon temple group.
Pingback: Gopuram Ganpati Backdrop – TheKraftco
I am unable to get the pdf manual from the site, even though I installed the chrome extension. Is it possible to send it by email? Thanks
Can you give me the measurements of base and side walls of the temple .. i made last yr with the measurements which you gave, came well but little tilted because the measurements were off.. if possible a pdf of the measurements would be greatly appreciated
Thanks
Did you watch my latest attempt video …i have provided measure in that pls watch carefully in cardboard