Welcome to TheKraftco – your go-to guide for exquisite crafts! Today, we embark on a spiritual journey as we guide you through the creation of a stunning miniature Kedarnath Temple using simple materials like cardboard, tissue paper, aluminum foil, and acrylic colors. So, let’s dive into the world of craftsmanship and create a divine masterpiece!

Materials Needed:
- Cardboard
- Tissue Paper
- Aluminum Foil Paper
- Skewers or Bamboo Sticks (Buy Link: Skewers on Amazon)
- Acrylic Colors
- Fevibond (Buy Link: Fevibond on Amazon)
Step by Step Guide
Step 1: Gather Your Materials
Before you begin, make sure you have all the materials listed above at your disposal. Lay them out in an organized manner, so you can easily access each item as needed.
Step 2: Download Dimensions
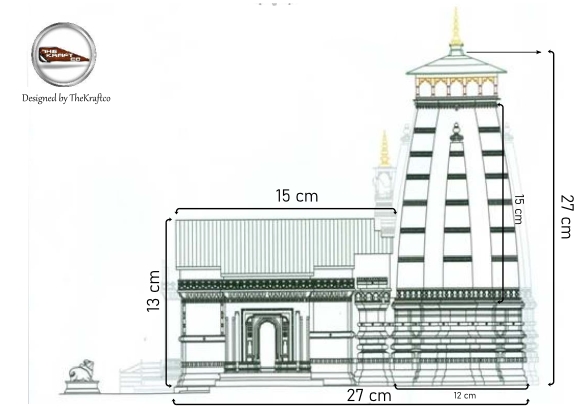
Visit TheKraftco’s Google Drive to access the dimensions required for this project. Print or view the dimensions on a separate screen to guide you through the construction process.
Step 3: Preparing the Base
Using the cardboard, cut out the base of your miniature Kedarnath Temple according to the dimensions provided. This will serve as the foundation.
Step 4: Choosing Cardboard ( Very Imp )
If you want a perfect cut and fine edges the you should choose a perfect cardboard, Choose a cardboard that doent have corrugated in between or you can use file card instead
Basically dont go for big boxes or cartons which we get in Amazon parcels
Problem with big boxes is while you cut the corrugated part gets pressed and cut is not fine
Step 5: Forming the Structure
Cut additional pieces of cardboard according to the dimensions for the walls of temple. Assemble them together using Fevibond to create the basic structure. Ensure that the proportions match the actual Kedarnath Temple.
Step 6: Tissue Paper and Skewers
Craft the roof of the temple using tissue paper to achieve a delicate and realistic look. Secure it in place using skewers or bamboo sticks. These sticks will also serve as the pillars, adding stability and authenticity to your miniature model.
Step 7: Painting
Bring your creation to life by painting it with acrylic colors. Pay attention to details such as the color of the temple walls, roof, and any decorative elements present on the actual structure.
Step 8: Finishing Touches
Allow the paint to dry completely before adding any final touches. Feel free to incorporate additional details like doors, windows, or any other architectural elements that define the Kedarnath Temple.
Ta-da!!
Congratulations! You’ve successfully crafted a miniature Kedarnath Temple, a testament to your artistic prowess and dedication to the craft. Display this divine creation proudly, and may it bring a sense of spirituality and awe to all who behold it.
Download Free Dimensions PDF
Everything here is free to explore and learn. If you’d like to fuel this page and keep it going, you can support through a donation.
💖 Support
Hi
I need your help please
I need dimension of kedarnath temple
Your Google drive link is expired and I can’t open it
Please help me